Spring(三)Spring MVC

从MVC到Spring Boot 这一篇中,搭建了 Spring Boot 的 Hello World 程序。这一篇继续学习基于 Spring MVC 框架的应用程序。应用程序由Spring Boot搭建。
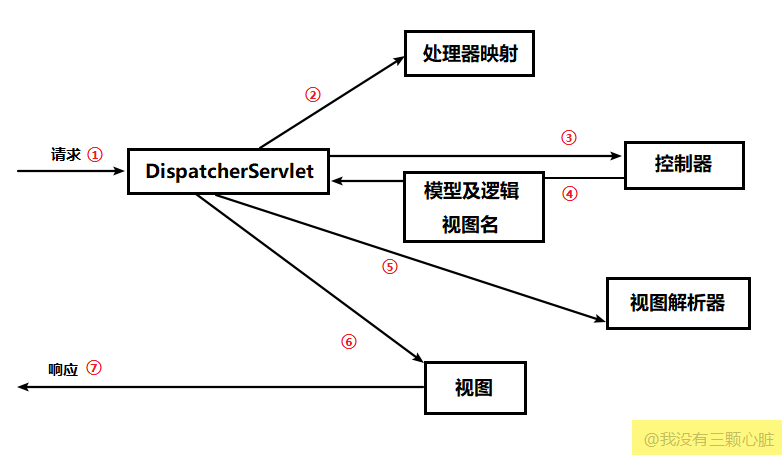

Spring MVC 的执行流程

在 Spring MVC 框架中,控制器实际上由两部分组成:

  1. 前端控制器(DispatcherServlet):用于拦截所有用户请求和处理通用代码
  2. 控制器(Controller): 实现实际的业务逻辑。

mvc

1. DispatcherServlet

用户请求统一被前端控制器 DispatcherServlet 捕获。DispatcherServlet 解析URL,得到URI,这个 URI 会被交给 Handle Mapping(处理器映射)。

2. Handle Mapping

Handle Mapping 会根据请求所携带的 URL 信息来进行决策,获取该 Handle 的所有相关对象,封装成 HandleExcutionChain 对象返回,DispatcherServlet 根据获得的 Handle,选择一个合适的 HandleAdapter。

3. Handle

HandlerAdapter 是处理器适配器,Spring MVC通 过HandlerAdapter 来实际调用处理函数。简单地说,就是让 HandlerAdapter 去调用 Handle 实际处理的方法,比如我们编写的 hello 方法。

1
2
3
4
public ModelAndView handleRequest(javax.servlet.http.HttpServletRequest httpServletRequest, javax.servlet.http.HttpServletResponse httpServletResponse) throws Exception {
// 处理逻辑
....
}

一般,Controller 是 Handler,但 Handler 不一定是 Controller。

填充 Handle 传入参数的过程中,Spring帮我们做了很多工作,包括:消息转换(json/xml -> 对象)、数据转换(String -> Integer)、数据格式化、数据验证等。

4. ModelAndView

Handle 处理完毕之后,会返回一个 Model, 仅仅有 Model 是不够的,用户看到一般是 View,因此把 Model 返回给 DispatcherServlet。

5. View Resolver

DispatcherServlet 会根据传过来的 Model,通过视图解析器(View Resolver)匹配一个适当的视图实现。

6. View

视图使用 Model 数据渲染出结果,这个输出结果会通过响应对象传递给客户端。


配置注解

  • @SpringBootApplication:表示这是一个Spring Boot应用程序,它其实包含了@ComponentScan@Configuration@EnableAutoConfiguration等多个注解。
  • @Configuration: 表示这是一个Java配置(相当于xml配置)
  • @EnableAutoConfiguration:顾名思义,开启自动配置
  • @ComponentScan:扫描包。默认扫描跟@SpringBootApplication所在类同级目录以及子目录。

URL路由

  • @Controller: 表示是一个处理HTTP请求的控制器(即MVC中的C),该类中所有被 @RequestMapping 标注的方法都会用来处理对应URL的请求。

返回字符串和对象

  • @ResponseBody:返回的是数据(Data),而不是视图(View)。如果数据是 Java 对象而不是字符串或基本数据类型,那么返回的就是 json 格式的(Spring MVC集成了jackson帮我们序列化)。
1
2
3
4
5
6
7
8
@Controller
public class IndexController {
@RequestMapping("/hello")
@ResponseBody
public String hello() {
return "hello";
}
}

或者用 @RestController,是 @Controller@ResponseBody 的合体

1
2
3
4
5
6
7
8
@RestController
public class IndexController {
@RequestMapping("/api/city")
public String hello() {
City city = cityService.getCity();
return city;
}
}
  • @RequestMapping: 浏览器请求映射路由,可以标记在方法上,也可以标记在类上。(详细用法可参考CSDN

@RequestMapping还可以细分为以下几个Mapping:

  • @GetMapping: 浏览器 GET 方法请求映射路由
  • @PutMapping
  • @PostMapping
  • @DeleteMapping

返回 HTML 页面

在 pom.xml 增加 thymeleaf 依赖(thymeleaf是一种比jsp更好的模板引擎)

1
2
3
4
5
6
7
8
9
10
<dependency>
<groupId>org.springframework.boot</groupId>
<artifactId>spring-boot-starter-thymeleaf</artifactId>
</dependency>

<dependency> <!-- 为了让Thymeleaf能够正确的识别HTML5 -->
<groupId>net.sourceforge.nekohtml</groupId>
<artifactId>nekohtml</artifactId>
<version>1.9.22</version>
</dependency>

Thymeleaf 遇到没有闭合的HTML标签会报错,可以在 application.properties 文件增加一行 spring.thymeleaf.mode=LEGACYHTML5 以支持HTML5

1
2
3
4
5
6
7
8
9
10
11
12
13
@Controller
public class AppController {
@GetMapping("/")
public String index() {
return "index";
}

@GetMapping("/home")
public String create() {
return "home";
}
}

在 resource/templates 目录下放置 index.html 和 home.html,访问 127.0.0.1:8080/ 将跳转到 index.html,访问 127.0.0.1:8080/home 将跳转到 home.html

如果我们的项目变大了,有数十个 html 文件,我们要写很多个这样的样板方法,可以用 java config 简化样板方法

MvcConfig.java

1
2
3
4
5
6
7
8
9
10
11
@Configuration
public class MvcConfig implements WebMvcConfigurer {

public void addViewControllers(ViewControllerRegistry registry) {
registry.addViewController("/home").setViewName("home");
registry.addViewController("/").setViewName("index");
registry.addViewController("/hello").setViewName("hello");
registry.addViewController("/login").setViewName("login");
}

}

PathVariable 和 RequestParam

使用PathVariable获取路径变量

1
2
3
4
@GetMapping("/users/{username}")
public String userProfile(@PathVariable String username) {
return String.format("user %s", username);
}

可以使用下列形式来匹配正则表达式,语法{变量名:正则表达式},不匹配的URL将不会被处理,直接返回404

1
@GetMapping("/users/{username:[a-z0-9_]+}")

[a-z0-9_]+是一个正则表达式,表示只能包含小写字母、数字和下划线。

当有多个路径变量时,用@PathVariable(value = "..")

1
2
3
4
5
6
@PostMapping("api/rate/{userId}/{productId}/{rating}")
public void rate(@PathVariable(value="userId") Integer userId,
@PathVariable(value = "productId") Integer productId,
@PathVariable(value = "rating") Integer rating){

}

使用 RequestParam 获取参数

有时候我们需要处理 URL 中的参数 ,比如127.0.0.1:8080/userinfo?key1=value1&key2=value2

1
2
3
4
5
6
7
8
9
@RestController
public class EditPetForm {

@GetMapping("/blogs")
public String setupForm(@RequestParam("id") int blogId) {
return String.format("blog id = %d", blogId);
}

}

访问 127.0.0.1:8080/blogs?id=66, 可以看到浏览器显示了 blog id = 66

  • 使用@RequestParam(name = "id", required = false, defaultValue = "1"),当参数不存在的时候,默认为1

如何选择

两种方式都能获取用户输入:

  • 通过@PathVariable,例如/blogs/1
  • 通过@RequestParam,例如blogs?blogId=1

建议:

  • 当URL指向的是某一具体业务资源(或者资源列表),例如博客、用户时,使用@PathVariable
  • 当URL需要对资源或者资源列表进行过滤、筛选时,用@RequestParam

例如用/blogs?state=publish而不是/blogs/state/publish来表示处于发布状态的博客文章

其他注解

  • @RequestHeader:获得请求头信息,作为方法参数
1
2
3
4
5
6
@RequestMapping("/requestheaderTest")
public void requestheaderTest(
@RequestHeader("User-Agent") String userAgent,
@RequestHeader("Accept") String[] accepts) {
// do something
}
  • @CookieValue:获取Cookie信息,作为方法参数
  • @SessionAttributes:允许我们有选择地指定 Model 中那些属性转存到 HttpSession 中。,一般注解在类上。
  • @ModelAttribute:将请求参数绑定到 Model 对象

使用Thymeleaf模板渲染

thy

后台发送数据给模板引擎

使用Thymeleaf作为模板引擎,在需要动态获取的地方用Thymeleaf标签替代。如

1
2
<h2 th:text="${title}">博客标题</h2>
<span th:text="${createdTime}">

在HTML中增加命令空间,避免IDE错误提示

1
2
3
4
<html xmlns="http://www.w3.org/1999/xhtml"
xmlns:th="http://www.thymeleaf.org">
...
</html>

首先需要在 Controller 做一些工作

1
2
3
4
5
6
@GetMapping(value = "/bookList")
public String getBookList(ModelMap map){
List<book> bl = bookService.findAll();
map.addAttribute("bookList", bl);
return "bookList";
}

也可以简化为

1
2
3
4
5
@GetMapping(value = "/bookList")
public String getBookList(ModelMap map){
map.addAttribute("bookList", bookService.findAll());
return "bookList";
}

这个 Controller 接收一个 ModelMap ,map.addAttribute()的第一个参数是属性名字,第二个参数是属性值,这个值就是 bookService.findAll()的返回结果。

这样就会把 bookService.findAll() 的结果( List<book> 类型,在addAttribute方法里面刚刚给它命名为bookList了)传给 bookList.html

在Servlet编程中,如果希望在页面中动态渲染信息,一般需要往HttpRequest中添加属性,然后在JSP中获取。其实Model的属性实际上也是放在HttpRequest的属性中,但是Spring MVC提供了更高层的抽象,帮你屏蔽了HttpRequest,你看到的只有直接以MVC中M(即Model)。

在模板中用th:each来遍历这个 List

1
2
3
4
5
6
7
8
9
10
11
12
13
14
15
16
<table class="table table-striped">
<thead>
<tr>
<th>博客</th>
<th>标题</th>
<th>内容</th>
</tr>
</thead>
<tbody>
<tr th:each="blog: ${blogList}">
<th scope="row" th:text="${blog.blogId}"></th>
<td th:text="${blog.blogTitle}"> </td>
<td th:text="${blog.blogContent}"></td>
</tr>
</tbody>
</table>

有时候我们会想点击某个标题跳转到详细页面,用th:href属性

1
<a href="#" th:href="@{'/blogs/'+${blog.id}}" th:text="${blog.title}"></a>

从前端模板接收数据

当用户进入 /create 路由,会跳转到创建博客的页面,createBlog()方法给前端传入了一个 blog 对象

1
2
3
4
5
6
7
/**
* 添加博客
*/
@GetMapping(value = "/create")
public String createBlog(Blog blog){
return BLOG_CREATE_PAGE;
}

创建博客页面有一个表单(form),表单提交数据

1
2
3
4
5
6
7
8
9
10
11
12
13
<form role="form" method='post' action="#" th:action="@{/blog/create/post}" th:object="${blog}" >
<div class="form-group">
<label for="blogTitle">微博标题</label>
<input type="text" class="form-control" id="blogTitle" th:field="*{blogTitle}" placeholder="输入文章标题">
</div>
<div class="form-group">
<label for="blogContent">微博内容</label>
<textarea class="form-control" rows="10" id="blogContent" th:field="*{blogContent}" placeholder="输入文章内容"></textarea>
</div>
<div align="center" class="form-group">
<button type="submit" class="btn btn-default">提交</button>
</div>
</form>
  • th:action="@{/blog/create/post}"表示要提交的路由
  • th:object="${blog}"表示接收从刚刚的路由传入的对象
  • th:field="*{blogTitle}"th:field="*{blogContent}"表示当按下提交按钮,这两个输入框的内容将会绑定为 blog 对象的 blogTitle属性 和 blogContent 属性。然后传回给后端。
1
2
3
4
5
6
7
8
/**
* 处理添加请求
*/
@PostMapping(value = "/create/post")
public String postBlog(@ModelAttribute(value="blog") Blog blog){
blogService.addBlog(blog.getBlogTitle(),blog.getBlogContent());
return "redirect:/blog/";
}

后端接收 blog 对象,进行处理。


ModelMap 和 ModelAndView 区别

在控制器方法中,我们传入了一个 ModelMap 参数,或者 ModelAndView 。区别如下:

  • ModelMap的实例是spirng mvc框架自动创建并作为控制器方法参数传入,用户无需自己创建。
1
2
3
4
5
6
7
8
9
public String xxxxmethod(String someparam,ModelMap model)
{
//省略方法处理逻辑若干
//将数据放置到ModelMap对象model中,第二个参数可以是任何java类型
model.addAttribute("key",someparam);
......
//返回跳转地址
return "path:handleok";
}
  • ModelAndView的实例是由用户手动创建的,这也是和ModelMap的一个区别。
1
2
3
4
5
6
7
8
9
10
11
public ModelAndView xxxxmethod(String someparam)
{
//省略方法处理逻辑若干
//构建ModelAndView实例,并设置跳转地址
ModelAndView view = new ModelAndView("path:handleok");
//将数据放置到ModelAndView对象view中,第二个参数可以是任何java类型
view.addObject("key",someparam);
......
//返回ModelAndView对象view
return view;
}

ModelAndView 实际上包含了两个 object :

  1. Model:用于渲染页面的 k-v 键值对数据
  2. View:填充了Model里面的数据的页面模板

@ModelAttribute与@RequestBody的区别

  • @RequestBody: 用于接收json,如ajax请求的data参数,在接收后直接转换成Pojo。支持 POST、PUT 等多种HTTP方法。
  • @ModelAttribute: 在 GET 请求中,用于直接接收URL的参数,如url?id=123&name=456 在接收后直接转换成Pojo。 在 POST 请求中, 用于接收POST提交的内容。

注: GET 请求参数还可用 @RequestParam 来获取。

1
2
3
4
5
6
7
8
9
10
/**
* 添加商品
* @param product
* @return
*/
@PutMapping("")
public Integer addProduct(@RequestBody Product product){
productService.addProduct(product);
return product.getId();
}

使用 PageHelper 分页

PageHelper 是 Mybatis 的一个分页插件。

获取最新版本:https://mvnrepository.com/artifact/com.github.pagehelper/pagehelper-spring-boot-starter

添加分页依赖

pom.xml

1
2
3
4
5
<dependency>
<groupId>com.github.pagehelper</groupId>
<artifactId>pagehelper-spring-boot-starter</artifactId>
<version>1.2.10</version>
</dependency>

控制器

1
2
3
4
5
6
7
8
9
10
11
12
13
14
15
/**
* 获取某个分类下所有在售商品
* @param cateId 分类ID
* @return
*/
@GetMapping(value = "{cate_id}/product")
@ResponseBody
public PageInfo<Product> getProductByCateId(@PathVariable(value = "cate_id") Integer cateId,
@RequestParam(value = "start", defaultValue = "1") int start,
@RequestParam(value = "size", defaultValue = "9") int size){
PageHelper.startPage(start,size,"id desc");
List<Product> products = categoryService.getProductByCateId(cateId);
PageInfo<Product> page = new PageInfo<>(products);
return page;
}

全局配置

在项目 resource 目录下,修改application.properties文件。

1
2
3
4
5
6
7
8
9
10
11
12
13
14
15
16
17
18
19
20
21
22
23
24
## 服务器配置
server.port = 8089
server.context-path=/test

## 数据源配置
spring.datasource.url=jdbc:mysql://localhost:3306/springbootdb?useUnicode=true&characterEncoding=utf8
spring.datasource.username=root
spring.datasource.password=123456
spring.datasource.driver-class-name=com.mysql.jdbc.Driver

## Mybatis 配置(仅xml方式)
mybatis.typeAliasesPackage=org.spring.springboot.domain
mybatis.mapperLocations=classpath:mapper/*.xml

## thymeleaf 配置
spring.thymeleaf.suffix=.html
spring.thymeleaf.prefix=classpath:templates
spring.thymeleaf.encoding=UTF-8
spring.thymeleaf.cache=false
spring.thymeleaf.mode=LEGACYHTML5

# JPA 相关配置
# 配置在日志中打印出执行的 SQL 语句信息
spring.jpa.show-sql=true